
 Posted By
Bajarangi soft ,
Posted On 18-01-2021
Posted By
Bajarangi soft ,
Posted On 18-01-2021
Schema::create('tags', function (Blueprint $table) {
    $table->increments('id');
    $table->string('name');
    $table->string('color');
    $table->timestamps();
});
class Tag extends Model
{
    protected $fillable = ['name', 'color'];
}
namespace App\Http\Controllers\Admin;

use App\Tag;
use Illuminate\Http\Request;
use App\Http\Controllers\Controller;
use App\Http\Requests\Admin\StoreTagsRequest;

class TagsController extends Controller
{
    public function index()
    {
        $tags = Tag::all();
        return view('admin.tags.index', compact('tags'));
    }

    public function create()
    {
        return view('admin.tags.create');
    }

    public function store(StoreTagsRequest $request)
    {
        $tag = Tag::create($request->all());
        return redirect()->route('admin.tags.index');
    }

    // ... other CRUD methods

}
Route::resource('tags', 'Admin\TagsController');
To view it all, we need two blade files.
resources/views/admin/tags/index.blade.php:
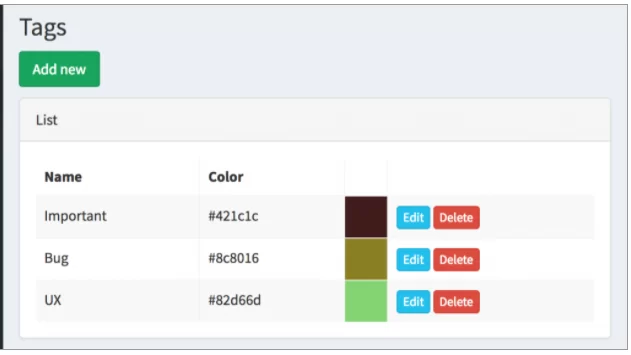
<table class="table table-bordered table-striped datatable">
    <thead>
        <tr>
            <th>Name</th>
            <th>Color</th>
            <th> </th>
        </tr>
    </thead>

    <tbody>
        @if (count($tags) > 0)
            @foreach ($tags as $tag)
                <tr data-entry-id="{{ $tag->id }}">
                    <td field-key='name'>{{ $tag->name }}</td>
                    <td field-key='color'>{{ $tag->color }}</td>
                    <td>
                        <a href="{{ route('admin.tags.edit',[$tag->id]) }}" class="btn btn-xs btn-info">Edit</a>
                        {!! Form::open(array(
                            'style' => 'display: inline-block;',
                            'method' => 'DELETE',
                            'onsubmit' => "return confirm('Are you sure?');",
                            'route' => ['admin.tags.destroy', $tag->id])) !!}
                        {!! Form::submit('Delete', array('class' => 'btn btn-xs btn-danger')) !!}
                        {!! Form::close() !!}
                    </td>
                </tr>
            @endforeach
        @else
            <tr>
                <td colspan="3">No entries in table</td>
            </tr>
        @endif
    </tbody>
</table>
<h3 class="page-title">Tags</h3>
{!! Form::open(['method' => 'POST', 'route' => ['admin.tags.store']]) !!}

<div class="panel panel-default">
    <div class="panel-heading">
        Create
    </div>

    <div class="panel-body">
        <div class="row">
            <div class="col-xs-12 form-group">
                {!! Form::label('name', 'Name', ['class' => 'control-label']) !!}
                {!! Form::text('name', old('name'), ['class' => 'form-control', 'placeholder' => '', 'required' => '']) !!}
                <p class="help-block"></p>
                @if($errors->has('name'))
                    <p class="help-block">
                        {{ $errors->first('name') }}
                    </p>
                @endif
            </div>
        </div>
        <div class="row">
            <div class="col-xs-12 form-group">
                {!! Form::label('color', 'Color', ['class' => 'control-label']) !!}
                {!! Form::text('color', old('color'), ['class' => 'form-control', 'placeholder' => '']) !!}
                <p class="help-block"></p>
                @if($errors->has('color'))
                    <p class="help-block">
                        {{ $errors->first('color') }}
                    </p>
                @endif
            </div>
        </div>

    </div>
</div>

{!! Form::submit('Save', ['class' => 'btn btn-danger']) !!}
{!! Form::close() !!}
So, what we need to do here to adapt colorpicker:
For JavaScript part of actually picking the color, we will choose one of the most popular library called Bootstrap Colorpicker and will load it from Cloudflare CDN.
In our <head> section of HTML, we need to add this
<link href="https://cdnjs.cloudflare.com/ajax/libs/bootstrap-colorpicker/2.5.3/css/bootstrap-colorpicker.min.css" rel="stylesheet">
Where to put it – depends on the structure of your layout, for me it’s resources/views/layouts/app.blade.php.
Now, in the same app.blade.php at the bottom we need to load jQuery and then add a section for javascript code
...
<script src="//code.jquery.com/jquery-1.11.3.min.js"></script>

@yield('javascript')
</body>
</html>
@section('javascript')
    <script src="https://cdnjs.cloudflare.com/ajax/libs/bootstrap-colorpicker/2.5.3/js/bootstrap-colorpicker.min.js"></script>
    <script>
        $('.colorpicker').colorpicker();
    </script>
@stop
<td style="background-color:{{ $tag->color }}"> </td>